Saturday, April 28, 2012

A Tubby Collage!


Yes, I'm watching some Gypsy's get married as I type this... 
as well as really missing my photo editing options on the computer...  but this dinkle laptop is I guess just barely cutting it for now...

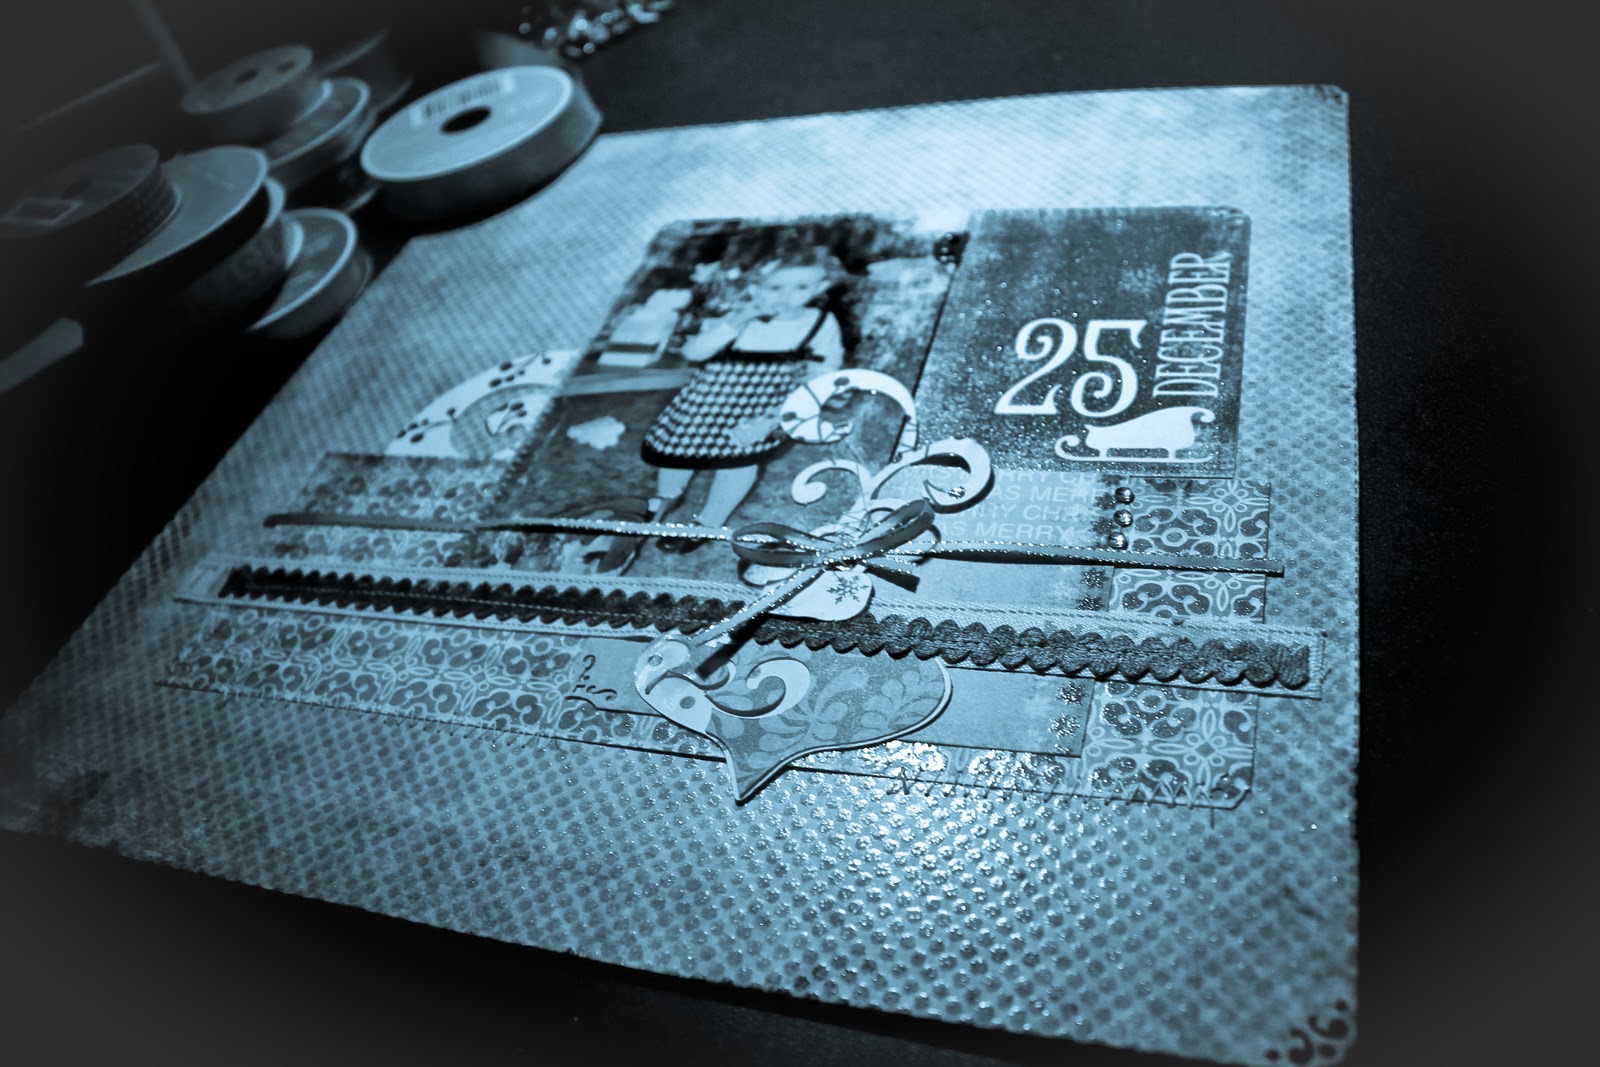
So here's my fry day layout... goes great with an ice cream cone!  And when you want to conserve space with a chunk of photos from the same shoot... just cut out the main event and leave your less than desirable tub out of it and make a new one!
 

The materials I used are: 
1. Three styles of scrapbooking paper
2. Cut outs from magazines and books
3. Fabrc scraps (on top, and a piece of fleece for towel)
4. Ribbon and lace scraps
5. The birds are cut from a set of notecards
6. crocheted flowers - these are from Closetomyheart.com, but you can get them at craft stores, etsy, or you can make em.
6. And some brads...  I used them to hold the flowers on.

The reason I did a collage type layout is because I was trying to stay away from using anything that ya'll might not have handy. Like if you said, I wanna do something like this tomorrow, you could without having to go get one of those fancy kitchenaid mixers. 

(I STILL don't have one... it's on my "OMG how am I living this long without you!" list.)

And since Youtube doesn't allow you to steal other people's music for your videos.. (heh... I'm no theify!), I decided to use some of the house mixes I was involved in with Beatlevel back in the day.. Though Beatlevel is officially broken up, Chris (Subject English) and Manish ( Oddme) have gone on to create their own mixes... so I asked them to let me use them for my videos! So you may want to just have a dance party instead of actually scrapbooking during this video....  hahaa...

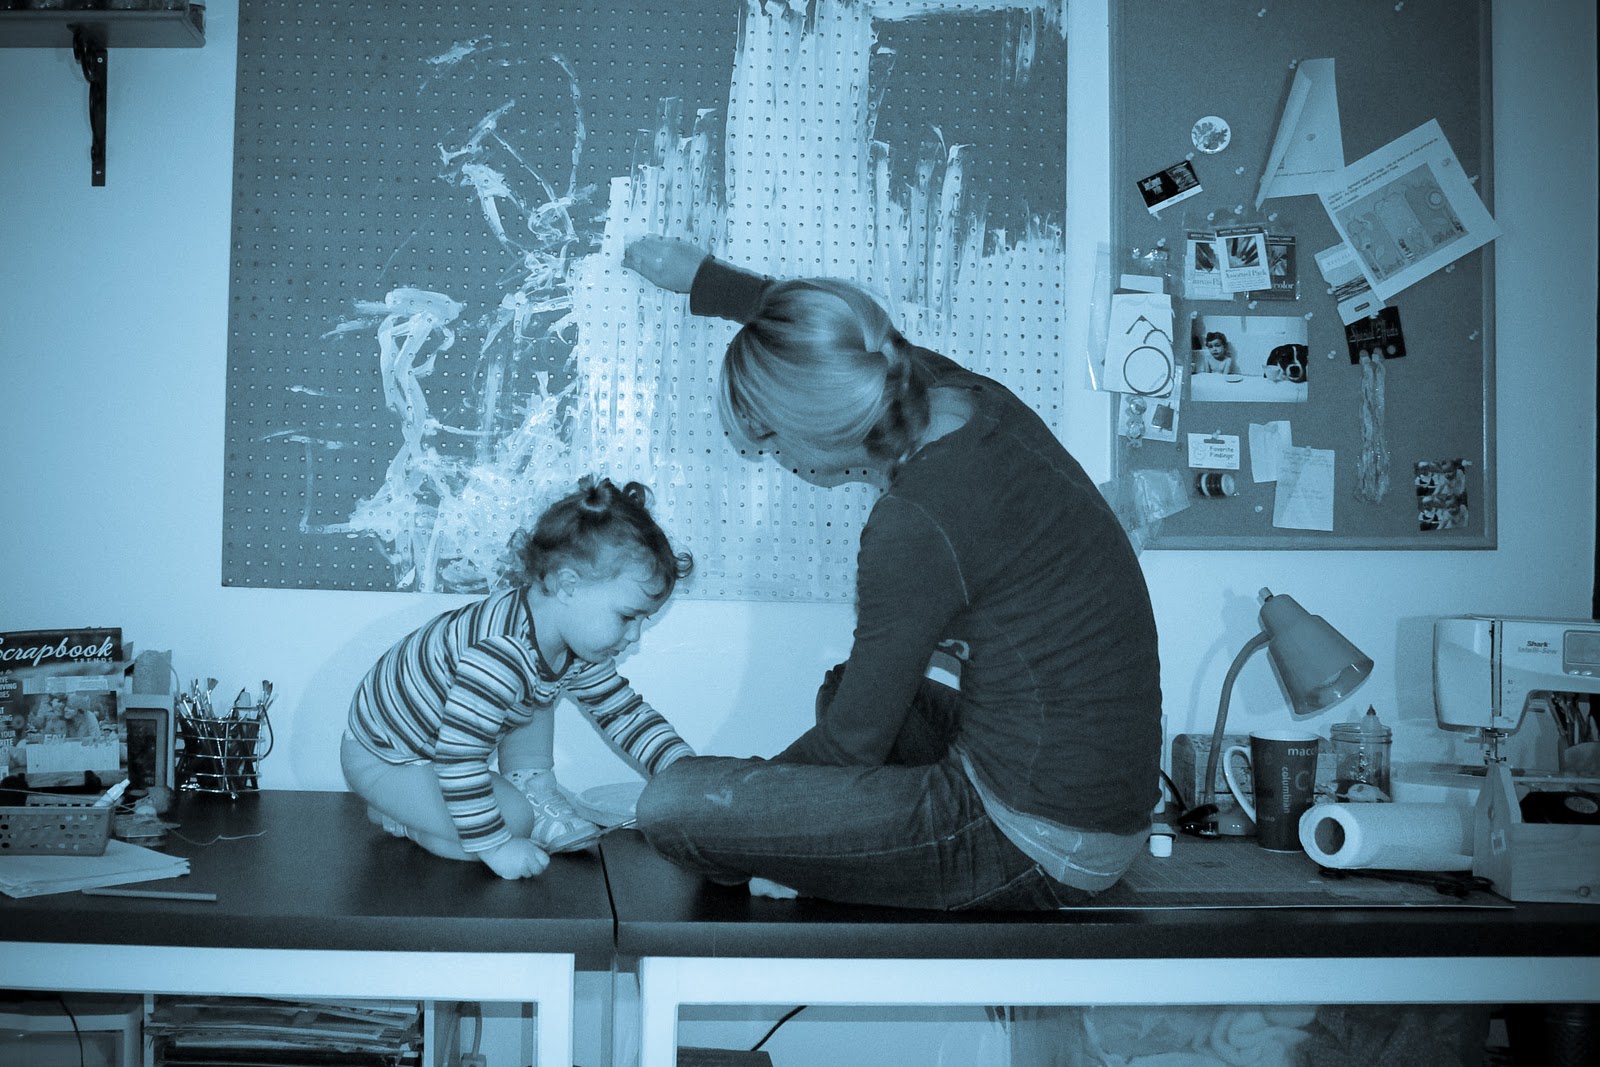
So here it is!  I'm still kinda working on the camera kinks...  I realize I have a real lighting problem in my crafty space so it's hard to find a good view... especially with my set up right against the wall...
But in this video there's a good view of the mess that is my papercrafting area... but it's all good by me...


Have a nice weekend!

Sunday, April 22, 2012

The Layered Layout

For inspiration when I'm stumped for a new scrapbook page layout, I start looking around the house... and sometimes, just sorting through books or cd's is enough. 
And when you're featuring kids, children's books always inspire.
 I also love going to the library to see the interesting ways the books are illustrated.
 You always find some really good arty tids and bits to add to your idea log!

So... today's layout is inspired by "In My Tree" by Sara Gillingham & Lorena Siminovich.
It's kinda one of those peek-a-boo books... but when I looked at the cover I thought... wow, this would make a really cute page!  And it kinda looks like it was more complicated than it really is.
And there's so many ways to take this basic idea and spin it.


This edition of THE FRIDAY LAYOUT features this
easy layout using layers of patterned paper to create this nice frame around your photo.


Here are some links for more information on the products I use during these scrapbooking vids...

Pazzles Inspiration:  The Cutting machine I'm using in the vid.
Cranberry Cat Scrapbook Supplies: I met these guys at the scrapbook retreat I went to in January, Great stuff, great prices!
Close to my Heart:  My favorite place for cardstock! Also, super cute embellishments and ideas!


Friday, April 13, 2012

THE FRIDAY LAYOUT, episode 1

Ok... so I've finally gotten around to some youtubing...

Since I have some three years of Easter photos lying around... and I'm sure ya'll have at least some recent ones, I thought I'd do a quick and easy page EASTER inspired.

And there is nothing used in this page that you probably don't already have around the house...
Cupcake liners are used to make the main embellishments here...
I had some leftover Easter liners from my carrot cupcakes... so I went for it!


For this project you will need:
1. One plain cardstock... I used a marigold color
2. Patterned paper... I used a couple different
3. Cupcake liners for the flowers
4. Buttons
5. Brads
6. Metal embellishment
7. 2" scalloped circle punch
8. Pen
9. Craft Thread

All items are optional... well, except for the paper... unless you're going to scrapbook on a plate or something.
This is a very easy basic layout.
You can add more to what I've done, or leave some of it out...  I mean, who am I to tell you what to do?


So grab your bunny ears and let's go!


HAVE A GREAT WEEKEND!

Saturday, February 4, 2012

Scrappetizers before dinner


So I went on my first ever scrapbooking "retreat" last weekend.
I thought I was the only one...  I thought... there can't be anyone who likes to scrapbook as much as me??
Ok, I really didn't think that, but I did think at least in my circles, and my circles once and twice removed, that there was no other.  Every time I bring up "scrapbooking" or the like to my friends or acquaintances, their responses usually include the words, "yea, that's pretty and all but who has time or patience..." So I almost gave up hope of finding a scrappy buddy.
Man, I am just filled up to my neck with cheese!
But I don't care.  Dip your cracker in me because I am not stopping.
And I'm not stopping the sepia either! Someone recently asked me to... and followed that with, "Is this 1980?" Was sepia really that popular in 1980?  Well...  I was only 2 so I didn't notice.

So what was I talking about?

OH!

Yes, the scraptastic weekend...   Ya know... you think before you go to something like this... "man, I DO like to scrapbook, but am I really going to want to do it for two days without interruption?
And the answer came to be...  "WAIT... NO...  we have to LEAVE ALREADY? ...  but... but... I wasn't.. lemme just...  PUT DOWN MY SEWING MACHINE I'M NOT FINISHED HERE BELL MAN!"
are they still called that?


Speaking of them, what a treat to have someone carry in all my stuff!  And carry it out again.  I think the one who carried my stuff in must've pointed me out to the others before the close of the thing, coz it was harder to catch one on the way out...

I only had that stuff over there--------------->


But anyway, though I missed my ROO ROO so incredibly much, spending a saturday thru sunday was still not enough time to make any good dent in my TADA list...  But also because I just take a long fitzin' time making decisions as I'm working ...
And I really can't post much of what I made there because it's mostly for other people...


So anyway,  the plus' are as follows:
1. Constant access to coffee
2. Constant access to food
3. Nice people to talk to
4. Nice people to be inspired by
5. Nice people to annoy with your noisy machines that you brought
6. Wait, that last one wasn't a plus... I felt really bad, but...  this was not fun time, this was SERIOUS TIME that happened to also be fun.  My noise had to come with... no choice.
7. Being able to stay up all night and scrap!  (I only made it till 4am... and that was with a wine break)
8. The vendors!   Great stuff and great prices!
9. Having interrupted scrap time!

Here is the blog:  Check it out if you are interested.  Kathy, whom I had the pleasure to meet and share some talk with, is absolutely magical and knows how to set up a fantastic event!
http://scrappetizer.blogspot.com/

I am going to try to make it to the one in the Poconos...  If I can sell enough on ebay and etsy, I'm there!

And that reminds me.. my etsy store will be up in the next month hopefully... just getting some small bulk made...  :)


Sunday, January 8, 2012

YOU WILL!!!


Well, One way to make sure you keep in mind all the things you'd like to get accomplished this year is to not only write em' down, but make em' pretty so that you'll feel inclined to actually do them because it would be such a damn shame to have prettified em' for nothing!  

This one is also from a scraplift challenge in my scrap group.  The example said "Want to..  How to"... but sometimes WANT never turns into done so.....

So it's not my idea, but I thought it was a good one!  Scrapbooking is not just for photos of your pet turtle Listerman!

And I also wanted to show you the writing power my new die cut machine has!  It  takes your pens and writes or draws with them...  KKKAAARAZZZY!  

Teapot is a whistlin!


Thursday, January 5, 2012

Sketch Challenge


Here's a page from a Sketch Challenge in my cafemom Scrapbook group. 
Great bunch of ladies!  Very inspiring.  Good way to get your juices flowing when you're stumped!

Next Gen Insider!

So excited to share with you the news that I was the Featured Artist in this month’s
 NextGen Insider!
Brought to you by Elizabeth Barry & Associates!  It was quite the lengthy interview, but was entirely a good time! And we also did a short vid here in the crafty space!
Check it out here:
NGaa (1 of 1)
NEXT GEN INSIDER JANUARY

Sunday, January 1, 2012

Happy 2012

HAPPY NEW YEAR!

I just talked to 2012 on the universe phone and she told me all the wonderful things that are already on the way to you!!! 

So get ready and make it a great year!!!

XOXO


Thursday, December 29, 2011

Tuesday, December 27, 2011

Pinterest

 Phil wouldn't steer you wrong would he?


FOLLOW ME and I'll FOLLOW YOU!!!

clicky up deres ^

If you don't know what pinterest is, you are really really missing out on something inspiring!  And for those of you who like to organize everything and are looking for a way to keep handy your interwebs findings..  this is def. for you! 


Do it!

Christmas time


It went fast as usual...  but trying to get my christmas cards together led me to some interesting photo shoots last sunday night...

And of course what I had planned to do for my cards ended up totally different...

So these are the photos I used...
I started a 2-page layout using these (minus the words) so I'll post that when I'm done.


There's a lot in the works for MadebyFitty.com

My husband is jumping on board to help with a web tutorial type project so that should be fun.  I plan to include Eleanor (Roo) --->
also since she just got her own sewing machine from Santa.

I have to say, she is quite crafty for a 2-year old... lol


Have a good night!

morning...  darn it why am I up????


Sunday, December 18, 2011

Oh Christmas Fleece, Oh Christmas Fleece...

Ok, here's the finished product.
Though Cliff wouldn't really let me get a pic of it without him in it...
I think I may have to make him one...


Daryl told me I spelled her name wrong...  
Eh... a few extra O's never hurt anyone.

So after making this, I decided this kinda thing would make a good gift... so I made two more but this time tweaked the recipe and added a little custom printing.  


I randomly found a sheet of that printer fabric in my drawer of printer paper and immediately the wheels started turning.  What kid doesn't like to look at their own face... on anything! I wish I could remember what brand it was because the photos printed beautifully, even after I messed with them. I kinda wanted em' to have that faded out old fashioned look.  


So instead of printing out the whole body, I just did their heads and appliqued scraps for the body.  The arms and lets I did with a zigzag stitch in the name of whimsy...
I only made them a sq. yard.  Figured it was a nice lap blanket or something easy to take in the car...

Just big enough to roll up in...

So I have some pieces of fleece left... I think I smell a Norma and Cliff present...  that is if I finish my Christmas cards...

merry merry merry merry merry merry merry merry!

Monday, December 12, 2011

Fabric scraps??

The best thing I’ve found to do with fabric scraps is…
Eleanor 014
to make appliques.

I’ve been itching to make a Christmas blankie for ROo this month…  and luckly JoAnn had a sale on fleece and flannel…
So I thought … why not make some appliques from my XL pile of material scraps that I can’t bring myself to throw out. Well it’s not that I can’t bring myself… I just plain think it’s a BAD IDEA!  lol.  They come in handy for tons of purposes. 
*Scrapbooking
*Baking
*Wrapping presents
*Making Collages
*Deco
*Making dog clothes…  (see video here)
Eleanor 012_thumb

Ok, maybe not baking so much…
1.  Pick out your fabrics and Iron on your fabric adhesive paper (heatbond)
2.  Wait till it cools off a bit…  10 seconds…
3.  Cut out your shape.  My trees are just triangles so I didn’t think it was necessary to pre-cut a pattern.  But you can make one out of paper and then trace it on the back of the heatbond reversed and then cut it out.  The simpler the shape, the better. Remember you’re gonna have to sew around it .
4.  Peel of the backing and iron it on to whatever background you’re using.
5.  Then sew the edge of your applique.  If you plan on washing the item you’re making… you’re best bet is to zigzag a tight stitch around the edge to prevent fraying. If it’s a display item or something you won’t be throwing in the wash, you can use a straight stitch but just be aware the edges won’t be as secure. And also remember what look you’re going for… a zigzag will leave a substantial outline to your applique so take that into account when choosing your thread color. Or you can choose black to make your appliques stand out.
I’ll post the end result at a later date…

Tuesday, December 6, 2011

So little time... so much Christmasing to do!


Even though, like all of you, I have a chalkboard wall full of things I need to do in the next couple weeks,  I still found it a good idea to scrap a random christmas photo from last year...  WHAT is my damage?
I don't quite know but I do know... when something inspires you, you gotta jump on it.  I'm so so very behind on my own scrapbooking that I'm no where near even last christmas...  so at least I can cross one page off...  I think it happened because I was looking through my computer for Christmas photos to put up around the house...  Anyway,  it's no lie I made a few ornaments and tags before I dove into this... so it wasn't a total waste of a night.  And it made me happy.  And I needed a 'happy' diversion to put me back on track.


So here's the color version.  Though I love color...  for some reason B&W and Sepia just set  a mood that I'm so addicted to... so I apologize and it will happen again...  probably everytime.

So there's my little Roo last Christmas...  I just wanna SQUOOOSH her every minute I exist! And she says... "Mommy, NO SQUOOOSH ME!!!"
But that just makes me wanna squoosh some more...

AHHHHH, like 18 days till Christmas...

Stay tuned!


Sunday, November 6, 2011

FINALLY!!


Well, I've had many many versions of a "craft" space before I've finally now gotten into something I can actually say I like. The tables Eleanor and I are sitting on my father built for me and installed about a week ago.  I say "installed" because my lovely home is made up of all crooked walls so naturally, nice straight tables did not fit perfectly as they should.  However, it still works. 

My biggest problem has always been work space. No matter what the project, I always found myself lining up tray tables... or taking it to the dining room table... or even on the deck because I just couldn't spread out enough. So I finally got the idea that I was going to make myself a big work table... yada yada...  And after picking my brother and father's brains, I'm happy to say Dad took over.  I think he thought I might hurt myself.  He also reinforced the peg board which according to him probably would've toppled down had I added one more spool of ribbon. 
So anyway, we started by painting that sucker white. 
I neglected to take "before" before pics... when I had a desk and a drafting table and bridge connecting the two. And I neglected to take any pictures from here till now.  But events such as calling my Dad to say, "WHAT IS WRONG WITH THESE SHELVES"  and "WHERE AM I GONNA PUT ALL THIS MATERIAL" happened. So I still have totes in the closet and garage filled with stuff.  I neglected to incorporate the chest of paints, and the drawing supplies...  And all the extra material.  I got some black fabric bins at target and decided the material I was gonna use first went in those, and the rest in the garage. 

So this is what I got right now:
I decided I really needed to make space for a few finished projects (shadow boxes) and some photos that made me happy.  I mean, scrapbooking revolves around photos so...  makes sense! Oh, and that bird painting I got for $20 at Pier One. Apparently there's a sale right now. LOVE IT!   But my point is, 
how can you create in a space that you're not inspired by? 

So, the cork board is now over the keyboard on the other side of the room. Did I mention this is also my music studio?  Heh... so now I have to work on the other half.  Also, there is just no good spot for an ironing board. Maybe I'll make a nice black and white cover for it so it at least matches...  

So I'd just like to say THANK YOU DAD! You=Awesome!  Please teach me to build things!