
Thursday, December 29, 2011
Tuesday, December 27, 2011
Phil wouldn't steer you wrong would he?
FOLLOW ME and I'll FOLLOW YOU!!!
clicky up deres ^
If you don't know what pinterest is, you are really really missing out on something inspiring! And for those of you who like to organize everything and are looking for a way to keep handy your interwebs findings.. this is def. for you!

Do it!
Christmas time
And of course what I had planned to do for my cards ended up totally different...


I started a 2-page layout using these (minus the words) so I'll post that when I'm done.
There's a lot in the works for MadebyFitty.com
My husband is jumping on board to help with a web tutorial type project so that should be fun. I plan to include Eleanor (Roo) --->


Have a good night!
morning... darn it why am I up????
Sunday, December 18, 2011
Oh Christmas Fleece, Oh Christmas Fleece...

Ok, here's the finished product.
Though Cliff wouldn't really let me get a pic of it without him in it...
I think I may have to make him one...
Daryl told me I spelled her name wrong...
Eh... a few extra O's never hurt anyone.
So after making this, I decided this kinda thing would make a good gift... so I made two more but this time tweaked the recipe and added a little custom printing.
 |
I randomly found a sheet of that printer fabric in my drawer of printer paper and immediately the wheels started turning. What kid doesn't like to look at their own face... on anything! I wish I could remember what brand it was because the photos printed beautifully, even after I messed with them. I kinda wanted em' to have that faded out old fashioned look.
 |

So I have some pieces of fleece left... I think I smell a Norma and Cliff present... that is if I finish my Christmas cards...
merry merry merry merry merry merry merry merry!
Monday, December 12, 2011
Fabric scraps??
The best thing I’ve found to do with fabric scraps is…

to make appliques.
I’ve been itching to make a Christmas blankie for ROo this month… and luckly JoAnn had a sale on fleece and flannel…
So I thought … why not make some appliques from my XL pile of material scraps that I can’t bring myself to throw out. Well it’s not that I can’t bring myself… I just plain think it’s a BAD IDEA! lol. They come in handy for tons of purposes.
*Scrapbooking
*Baking
*Wrapping presents
*Making Collages
*Deco
*Making dog clothes… (see video here)

Ok, maybe not baking so much…
…

to make appliques.
I’ve been itching to make a Christmas blankie for ROo this month… and luckly JoAnn had a sale on fleece and flannel…
So I thought … why not make some appliques from my XL pile of material scraps that I can’t bring myself to throw out. Well it’s not that I can’t bring myself… I just plain think it’s a BAD IDEA! lol. They come in handy for tons of purposes.
*Scrapbooking
*Baking
*Wrapping presents
*Making Collages
*Deco
*Making dog clothes… (see video here)

Ok, maybe not baking so much…
1. Pick out your fabrics and Iron on your fabric adhesive paper (heatbond)I’ll post the end result at a later date…
2. Wait till it cools off a bit… 10 seconds…
3. Cut out your shape. My trees are just triangles so I didn’t think it was necessary to pre-cut a pattern. But you can make one out of paper and then trace it on the back of the heatbond reversed and then cut it out. The simpler the shape, the better. Remember you’re gonna have to sew around it .
4. Peel of the backing and iron it on to whatever background you’re using.
5. Then sew the edge of your applique. If you plan on washing the item you’re making… you’re best bet is to zigzag a tight stitch around the edge to prevent fraying. If it’s a display item or something you won’t be throwing in the wash, you can use a straight stitch but just be aware the edges won’t be as secure. And also remember what look you’re going for… a zigzag will leave a substantial outline to your applique so take that into account when choosing your thread color. Or you can choose black to make your appliques stand out.
…
Tuesday, December 6, 2011
So little time... so much Christmasing to do!
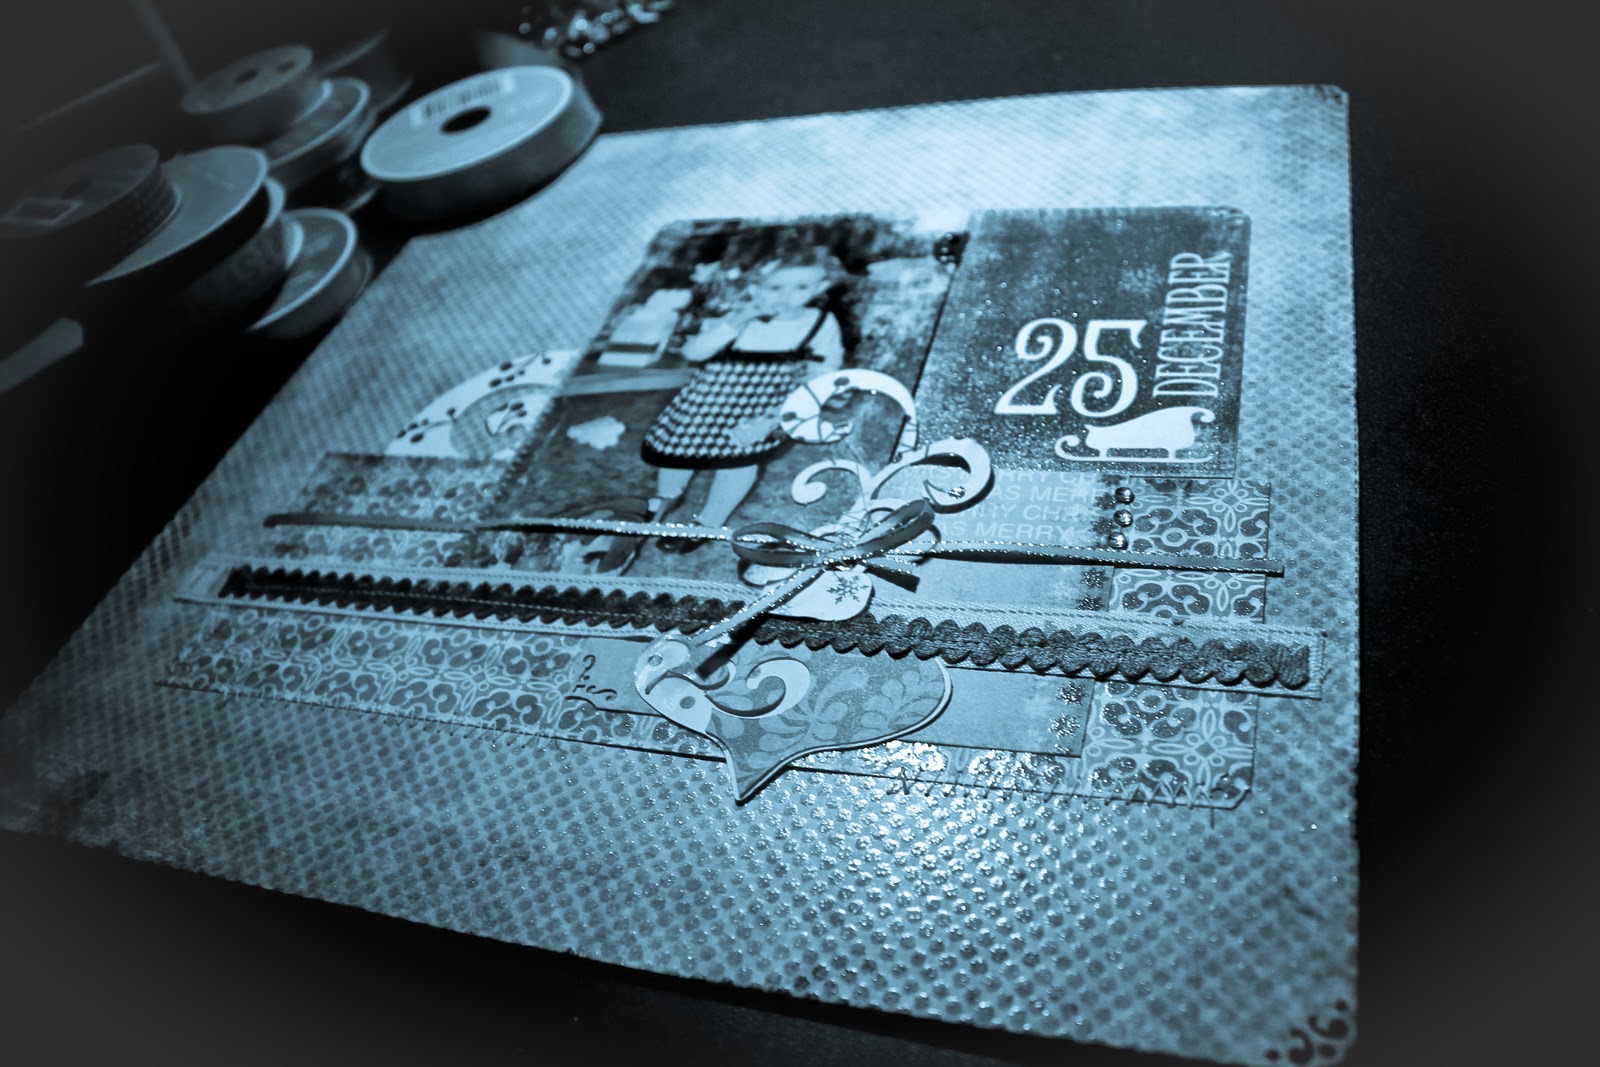
Even though, like all of you, I have a chalkboard wall full of things I need to do in the next couple weeks, I still found it a good idea to scrap a random christmas photo from last year... WHAT is my damage?
I don't quite know but I do know... when something inspires you, you gotta jump on it. I'm so so very behind on my own scrapbooking that I'm no where near even last christmas... so at least I can cross one page off... I think it happened because I was looking through my computer for Christmas photos to put up around the house... Anyway, it's no lie I made a few ornaments and tags before I dove into this... so it wasn't a total waste of a night. And it made me happy. And I needed a 'happy' diversion to put me back on track.

So here's the color version. Though I love color... for some reason B&W and Sepia just set a mood that I'm so addicted to... so I apologize and it will happen again... probably everytime.
So there's my little Roo last Christmas... I just wanna SQUOOOSH her every minute I exist! And she says... "Mommy, NO SQUOOOSH ME!!!"
But that just makes me wanna squoosh some more...
AHHHHH, like 18 days till Christmas...
Stay tuned!
Sunday, November 6, 2011
FINALLY!!
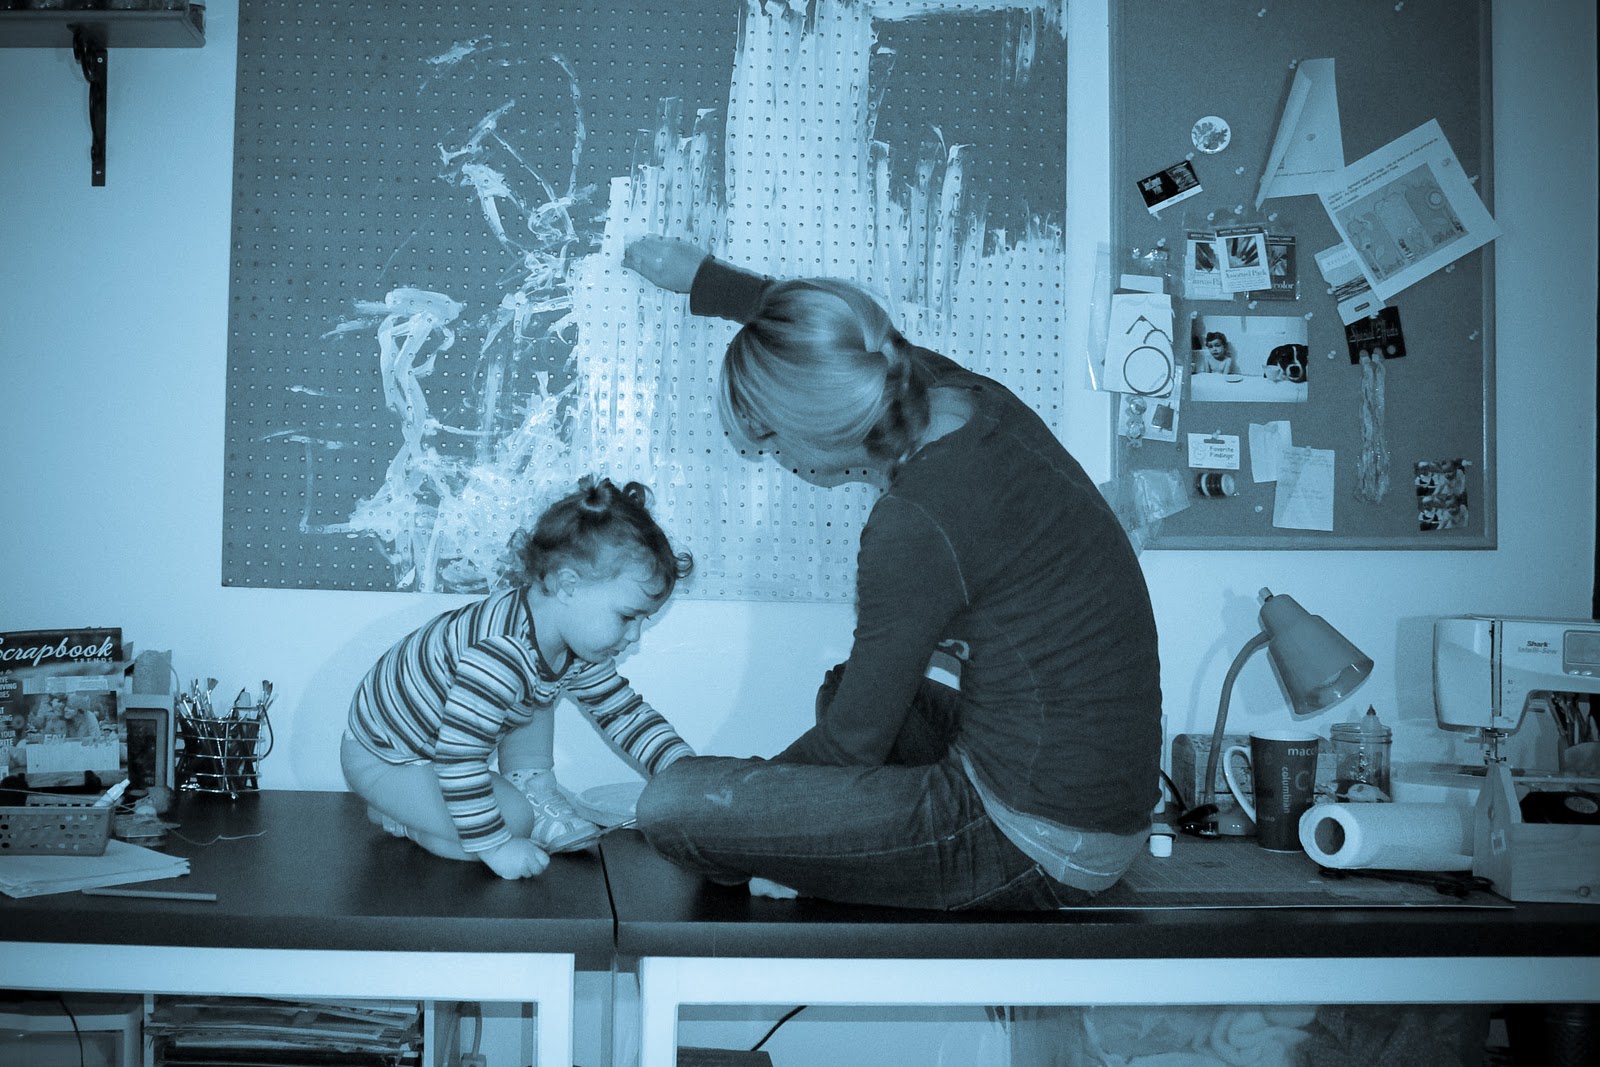
Well, I've had many many versions of a "craft" space before I've finally now gotten into something I can actually say I like. The tables Eleanor and I are sitting on my father built for me and installed about a week ago. I say "installed" because my lovely home is made up of all crooked walls so naturally, nice straight tables did not fit perfectly as they should. However, it still works.

My biggest problem has always been work space. No matter what the project, I always found myself lining up tray tables... or taking it to the dining room table... or even on the deck because I just couldn't spread out enough. So I finally got the idea that I was going to make myself a big work table... yada yada... And after picking my brother and father's brains, I'm happy to say Dad took over. I think he thought I might hurt myself. He also reinforced the peg board which according to him probably would've toppled down had I added one more spool of ribbon.
So anyway, we started by painting that sucker white.

I neglected to take "before" before pics... when I had a desk and a drafting table and bridge connecting the two. And I neglected to take any pictures from here till now. But events such as calling my Dad to say, "WHAT IS WRONG WITH THESE SHELVES" and "WHERE AM I GONNA PUT ALL THIS MATERIAL" happened. So I still have totes in the closet and garage filled with stuff. I neglected to incorporate the chest of paints, and the drawing supplies... And all the extra material. I got some black fabric bins at target and decided the material I was gonna use first went in those, and the rest in the garage.
So this is what I got right now:

I decided I really needed to make space for a few finished projects (shadow boxes) and some photos that made me happy. I mean, scrapbooking revolves around photos so... makes sense! Oh, and that bird painting I got for $20 at Pier One. Apparently there's a sale right now. LOVE IT! But my point is,
how can you create in a space that you're not inspired by?
So, the cork board is now over the keyboard on the other side of the room. Did I mention this is also my music studio? Heh... so now I have to work on the other half. Also, there is just no good spot for an ironing board. Maybe I'll make a nice black and white cover for it so it at least matches...
So I'd just like to say THANK YOU DAD! You=Awesome! Please teach me to build things!
Tuesday, October 11, 2011
Apps Apps Apps
The main reason I love my iphone is that the photo apps are oh so much fun!
Before I take in a few pages in bed at night, I like to fool around with the photos in my phone...
The main reason I hate my iphone is that the home button just refuses to work anymore. I pretty much pound on it 17 times.. and I usually end up getting that blue screen with the japanese writing (not really sure) and the big cancel button on the bottom...
ANYWAY, that's besides the point...
I'm not a photographer, but I LOVE taking pictures. And it's mostly pics of my daughter... who else. The dogs are still in denial that they've been replaced but I'm sure one of these days they'll get over it...
So here are a few of my favorite iphone photo apps:
Photostudio:
*Lots of effects
*alter hue, brightness, gamma, crop
*Make your daughter look like she was born in the 1940s... (shown below)


This one was an effect called color stroke. It lets you pick out one group of colors (red) to expose and keeps the rest black and white. It's an extra 99 cents for this effect but I think it's worth it.
You can also layer effects, I forget right now which other effects I have on there, but I'm pretty sure there a couple more..
And I have to add that I've printed a bunch of photos I took with my iphone and uploaded onto my computer, and they printed beautifully... I may dedicate a scrapbook just to these altered pics alone... FUN FUN FUN!
Other apps I use on a regular basis include:
* Pic Grunger- self explanatory
* Photofunia - very cool, put your photos in great situations!
And with one of the recent updates, you can use multiple photos. (shown below)

* Photogene I use mostly to do quick things like crop or brighten... still useful
* Juxtaposer- Good for putting someone's head on a turtle body, or vice versa... (I used this app two years ago to make my christmas cards...)
* Typedrawing - Word art! Who couldn't love it!!

This photo is a combo of Juxtaposer and Typedrawing...
heh... that's another good thing about the apps:
- you alter a photo in one app, then you save it and open it in another app and keep altering! It's like never ending possibilities!
And the updates just keep making the apps better!
Ok, I have some serious work to do!
Thank you and goodnight!
FITTYMAGEEHEADPANTS
Thursday, September 22, 2011
Yo Gabba Gabba
Is it just me, or can you only buy Yo Gabba clothes in England?
So for reasons like:
I won't be in England anytime soon...
and those Gabba faces aren't too strewn with intricate features
Why can't we make our own Gabba inspired attire?!?
We can!
And we did... in honor or Eleanor's 2nd birthday.
And we did it with:
Cotton fabric
Heatbond
Sewing machine
iron, ironing board
Coffee
Apple muffins
The gabba faces... they're just shapes. And not even complicated shapes. No trapezoid's... just your basic circles and triangles.. mostly circles...
 To make a long story short... because this is not sewing .0167854 blog. And I am not a black belt (yet) in sewing.. I will just highlight a few tips, and if you have further questions, please comment.
Anytime you are going to apply a decoration (applique) or a face in this case, Iron on some heatbond first to make sure the edges stay nice and it's a bit sturdier.
I did this with the pink face. You could've also done it with the eyes and mouth but I figured it'd be ok without. And it was, it went through the wash and came out in one piece. Though the party stains remain...
Even before the heatbond though... the fabric! It is so damn hard to find cool fabric around here!
The middle (base) fabric for this dress was from the collection my grandmother gave me. The patterned pieces I bought from Etsy. And they are gorgeous! Very vintagy... girly... yummy! So if you just accent something plain with some really cool scraps, you can still make it look expensive! I thought using the vintage fabric for Foofa's flower made a huge difference than if I would've just left it pink. I think it took it from "cheesy character" dress to "Shabamalama adorable" dress. But that's just me. And at the same time, still
reminds you of the clothes you'd find the kids wearing on the show.

The belt: Easiest way I know how to make a quick belt is the good ol' fold in half twice and top stitch method. Cut your length and then a 2-3 inch width. Fold in half length-wise, then fold the sides in to meet the inside fold. (ironing all the way) Then fold in half once more, iron, and top stitch all the way around. You can either tuck the ends under or cut an angle and sew closed.
So for reasons like:
I won't be in England anytime soon...
and those Gabba faces aren't too strewn with intricate features
Why can't we make our own Gabba inspired attire?!?
We can!
And we did... in honor or Eleanor's 2nd birthday.
And we did it with:
Cotton fabric
Heatbond
Sewing machine
iron, ironing board
Coffee
Apple muffins
The gabba faces... they're just shapes. And not even complicated shapes. No trapezoid's... just your basic circles and triangles.. mostly circles...

Anytime you are going to apply a decoration (applique) or a face in this case, Iron on some heatbond first to make sure the edges stay nice and it's a bit sturdier.
I did this with the pink face. You could've also done it with the eyes and mouth but I figured it'd be ok without. And it was, it went through the wash and came out in one piece. Though the party stains remain...
Even before the heatbond though... the fabric! It is so damn hard to find cool fabric around here!
The middle (base) fabric for this dress was from the collection my grandmother gave me. The patterned pieces I bought from Etsy. And they are gorgeous! Very vintagy... girly... yummy! So if you just accent something plain with some really cool scraps, you can still make it look expensive! I thought using the vintage fabric for Foofa's flower made a huge difference than if I would've just left it pink. I think it took it from "cheesy character" dress to "Shabamalama adorable" dress. But that's just me. And at the same time, still
reminds you of the clothes you'd find the kids wearing on the show.

The belt: Easiest way I know how to make a quick belt is the good ol' fold in half twice and top stitch method. Cut your length and then a 2-3 inch width. Fold in half length-wise, then fold the sides in to meet the inside fold. (ironing all the way) Then fold in half once more, iron, and top stitch all the way around. You can either tuck the ends under or cut an angle and sew closed.
well, some noodles are calling me... so I will hopefully return in a timely fashion... or a gabba fashion... probably neither... hopefully both.
Saturday, July 30, 2011
Thanks... a lot.
I'm so appreciative for your thoughtfulness that I actually MADE you a card. I cut down a tree in the yard,... made paper... and the rest is in my personal journal....

Ok cards... I don't make em' much. I slapped these two together because I'm in the middle of a scrapathon... So I decided while I had all my stamps and saucies out... I would make a couple.
So, I just said I don't make cards a lot... but in my brain, I wish I did. Because not only is it guaranteed to be original.. but it's nice to get a card for no reason at all... and an "original for no reason" card would be wonderful to receive! So I'm gonna put that on my TADA! list.
I just made that up. It was a to do list before 5 seconds ago. BRB.
Ok, I just scratched out to do and wrote TADA. Because the store is closed now, or else I would go get a new notebook that didn't already have in it's cell memory that it was previously called to do.
Because ya know what people. Everything you do should be a TADA! I mean, if it's paying the doctor bill, why not pay it and then call and check that they received the payment. Or if it's cleaning the stove... why not lift up the hood and really make sure nothing is going to make your cooking dinner smell funny.
Or if your car needs a radiator flush... why not just get a new radiator... OK FINE. That TADA belonged to the mechanic, not me. "TADA! I didn't need that extra money to pay for daycare!"
Why does this have nothing to do with thank you cards?
Ok, I have a stamp set all about thank you's... so I'm using them.
And these two card layouts above took less than 5 minutes to make.
Four easy steps!
1. STICK 2. STAMP 3. SEW 4. SIGN
And I guess there was a little "doodle" involved here too, but that's optional.
Stick the paper together whichever way you like best.
Pick the appropriate stamp or embellishment
Sew is also optional, but it's a staple in my scrapbooking tool kit these days...
* I collect scraps of material for stuff like this. It adds so much to a card or scrapbook page... and it doesn't have to be all neat and perfect... bunch it up and sew it on!*
Sign your name and you are finished!
And it might be better if you didn't read this post and maybe just looked at the picture. I mean, you're a visual learner right? That's all you need to know... Trust your lenses...
Monday, July 4, 2011
Aprons!
I don't know about you, but I feel the Apron gods asking me to update their look...
Ok, so maybe they're asking someone else but I def. get a scent of apron in the air lately...
So first of all, let me introduce Madeline. I bought her for $7 at a yard sale, and the previous owners told me her name was Madeline. And I'm not one to go changin' names... so Madeline it is. Maybe I'll make her a balloon head...
So obviously, this apron is too small for Madeline. But it's perfect for my almost 2 yr. old...
And little girls love to dress up. What am I saying, my nephew would probably be more eager to wear this than my daughter...
When I did get it on her, I guess she decided it was time to make coffee...
 And since she did such a good job with that, I think she can handle the turkey this year...
I got this fabric at JoAnn's. (sorry to say it's not from Grams collection) It's got CHICKENS! And I was brave enough to throw a fancy stitch on there.. I say brave coz my sewing machine is always jamming up... leaving big knots of thread ... and it's hard to pick up a fancy stitch and still have it look nice after that...
But for some reason, it was behaving during this particular project.

Ok, so maybe they're asking someone else but I def. get a scent of apron in the air lately...
 |
| Chicken Apron |
So first of all, let me introduce Madeline. I bought her for $7 at a yard sale, and the previous owners told me her name was Madeline. And I'm not one to go changin' names... so Madeline it is. Maybe I'll make her a balloon head...
So obviously, this apron is too small for Madeline. But it's perfect for my almost 2 yr. old...
And little girls love to dress up. What am I saying, my nephew would probably be more eager to wear this than my daughter...
When I did get it on her, I guess she decided it was time to make coffee...

I got this fabric at JoAnn's. (sorry to say it's not from Grams collection) It's got CHICKENS! And I was brave enough to throw a fancy stitch on there.. I say brave coz my sewing machine is always jamming up... leaving big knots of thread ... and it's hard to pick up a fancy stitch and still have it look nice after that...
But for some reason, it was behaving during this particular project.

And this little guy was just something I threw together for family picnics this summer. Who couldn't use a cute little helper on the BBQ!
 |
| BBQ apron |
Well, Speaking of BBQ's. It is July 4th, so I hope you're having one! Should be a nicer day than yesterday...
Wednesday, June 1, 2011
My attendance record is Schmeeered
So my craft room is in a shambles... which is why I haven't been around. I'm in the middle of re-mapping the whole area to be a bit more ... user friendly. So stand by... perhaps Roo and I will do a craft web show... or not.
I have been working on some things... but most of which I cannot post because they are either gifts or secret secrets! AHHH
I'm still working on some templates... it takes a lot of mistakes before you come up with a solid foundation.
But I kinda like this little chickadee I threw together over the weekend... It's actually all hand-sewn. It seems to stay together better that way... Daryl named her Ginger... I think coz we just watched that episode of Glee...

and the following photos show her ability to cuddle and be creepy... with humans and animals alike...


So perhaps I throw some more together... though the only big piece of felty material in my inheritance from GG was the whitey white Ginger is donning... so I may have to go crayola and purchase some other varieties of skin tone..
Though I think I will start a mission to use every single piece of material my grandmother gave me to make something! It would seem that mission has already been started without my actually saying it to myself.... so let the interwebs be informed... It is now official.
Sunday, April 3, 2011
Egg free Easter

So even though dying eggs is not an option this year for Easter... I think painting wooden ones was even more fun!
And we haven't even made a dent in the pile of wooden eggs we got. Which is why we started so early. So if we do some each weekend, we should be able to get through em all...
Though really, a little nest of these suckers would look really cute on your dining room table any time of year... the wheels are def. turning...

So there's actually a lot you can do besides just paint... we did some crackle... some modge podge with other papers... some glitter of course... and even some stamping!
I'll let ya know if we come up with anything else...
So I doubt she'll even care to dye an egg... anything paint involved, she's usually up for.
And then I realized I should really make her an art smock...
And here's Roo's egg painting vid in case anyone needs a moving visual...
Wednesday, March 30, 2011
Bag
I'm hoping on slowly but seriously compiling a folder of templates from which to make a reservoir of items to showcase on etsy. This may take some time. But I've come up with a weekly schedule that allows for specific time for each thing I'd like to accomplish.
And of course I don't know who I'm kidding when I think that's actually gonna happen and I'll be all productive and ongoing... but nevertheless... we just keep movin' however fast or slow we go... don't we!
So anyway, for now, I've made a few of these...
I think this might be a keeper template...


And of course I don't know who I'm kidding when I think that's actually gonna happen and I'll be all productive and ongoing... but nevertheless... we just keep movin' however fast or slow we go... don't we!
So anyway, for now, I've made a few of these...
I think this might be a keeper template...


So next I've gotta get to some scrapbooking!
I've started working on some digital pages, and it's just as addicting as the 3D stuff...
Here's a WIP so far...

HAPPY HUMP DAY!
Friday, March 18, 2011

Monday, February 7, 2011
Wall Pockets!
 So there's the mail basket on the kitchen table...
always overflowing... always hard to find particular items of correspondence.
So here's my solution.
 I actually meant to make this a wall organizer for crafts... but then for some reason it took a turn toward the kitchen...
I thought we could use a little more organization for our mail... and other stuff we need to keep handy.

One other thing I never did before was stamp on material. I just didn't feel like sewing those words on... so I figured maybe I could stamp on some letters and ... a bird.
And I think it's safe to say it works.
Though now I'm tied to putting certain things in certain pockets.... Why do I make commitments I can't keep!

Saturday, February 5, 2011
Hearts Hearts Hearts


These were some of my entries I threw together this evening for a crop who's challenges were due 7 minutes ago.
So after a rough "getting to bed" evening for my little girl, who's now in my bed with Cliff... I was determined to get involved at least a little this month...
This scrap group I became a part of in November has proved to be some of the sweetest women I associate with.
And they have online crops every month... and I can never seem to get my act together enough to participate.
But this month, there are 2 mini crops due to superbowl.. and other goings on...
So... It's love month, so I decided to add some hearts and flowers... Ok, flowers are a big part of my usual routine... I know. But hearts, not so much. The first thing I got pictured up there is an ATC card. Then we have a 12x12 layout featuring my friend Mo's lovely daughter Brielyn.
 And here we have a pocket card. A nice little nook for your love note to go...
Well, hopefully I can host a cropping soon... I hear the darling stirring so I will catch up with you folks later! Enjoy your Sunday and your football. I will be enjoying my Sunday by unplugging the TV.

Monday, January 31, 2011
Couple Stamp Ideas
Stamps, can't get enough. It's funny because I really never got the whole "stamp" thing ten years ago... I just used stickers. I have to say that now I rarely use stickers. I love stickers, but not for scrapbooking... unless they are really exceptional and can pass a short quiz before being considered for my art. As far as decorating my calendar and planner and notebooks... stickers are key! Because you may not want Spongebob next to your nephew at his Christening, but you may want him reminding you to go to the dentist.
So anyway, here's a couple things you can do with stamps.

The lighthouse was nice looking all in black and white... but I decided to grab my colored pencils and give it a little color. And then with a felt tip pen, I accented some edges and added some shadow....
And you thought you'd never color again!
( also, stamping an image a few times on the same page without re-inking it creates a nice effect. You have lighter versions of the same image.... kinda makes a nice background... ex. the sand dollar and shell images lining the bottom)
2. Cut em out!

and my answer to that is, if you want to do something, and you want that something to look as nice as it possibly can in your eyes, you will take one further step in assuring that will happen. If you don't need your project done by tomorrow, then why not do a little tonight and a little tomorrow. I find sometimes if you leave it unfinished and come back to it the next day, it comes out better because you end up seeing it the next day with fresh eyes and you'll have a better idea of what will make it work.

Looking forward to some sweet dreams!
G'night all.
Subscribe to:
Posts (Atom)